Real Estate Photo Editing: Complete Step-by-Step Guide for Listings That Sell
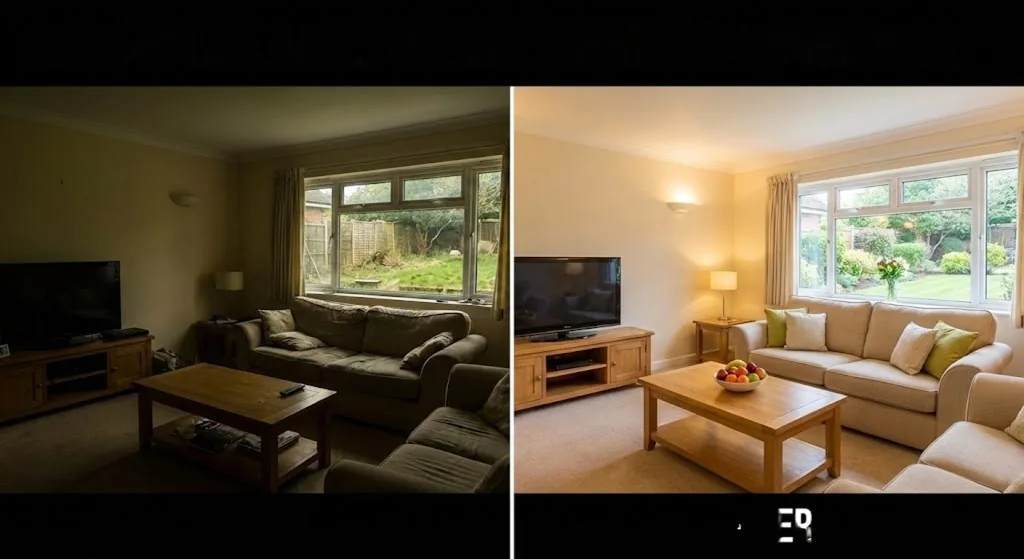
Table of Contents
- Quick Summary
- Why Unedited Listing Photos Cost You Sales
- Step-by-Step: Essential Edits Every Listing Needs
- Step-by-Step: Advanced Edits That Drive Clicks
- Practical Example: Full Editing Workflow
- Tools: DIY vs. AI vs. Outsourcing
- Professional Tips
- Common Mistakes to Avoid
- Ethical Limits: What You Can and Cannot Edit
- Frequently Asked Questions
- The Future of Real Estate Photo Editing
Quick Summary
The short answer: Professional real estate photo editing follows a consistent six-step workflow — correct white balance and exposure, fix lens distortion and perspective, blend for balanced lighting (HDR or flambient), replace the sky if needed, remove clutter and unwanted objects, then upscale for MLS output. Each step is covered in full below, along with the right tool for each task, pricing benchmarks, and the ethical line that separates enhancement from misrepresentation.
Properties with professionally edited photos sell 32% faster than listings with unedited images. Buyers spend 2–3 seconds deciding whether to click on a listing — image quality is the deciding factor in that window. This guide covers every technique you need, in the order you should apply them.
Why Unedited Listing Photos Cost You Sales
Unedited real estate photos fail for predictable, fixable reasons. Understanding each failure mode is the first step toward knowing which edits matter most for a given property.
Common Problems in Unedited Photos
- Uneven lighting — dark shadows alongside blown-out window areas in the same frame
- Color casts from mixed light sources (daylight, incandescent, fluorescent) that make walls look yellow, green, or blue
- Lens distortion from wide-angle cameras that makes walls bow and rooms look smaller
- Leaning verticals — walls that appear to converge toward the top of the frame
- Visible clutter, personal items, and temporary objects that prevent buyers from mentally placing themselves in the space
- Low resolution that looks pixelated or soft on MLS platforms and large screens
What Professionally Edited Photos Deliver
- Balanced exposure that shows both room detail and window views in a single image
- Neutral, natural color that represents the actual appearance of walls, floors, and fixtures
- Corrected perspective with perfectly straight verticals and level horizontals
- Clean, decluttered spaces that direct buyer attention to the property's features
- High-resolution output that displays sharply across all devices and MLS platforms
Step-by-Step: Essential Edits Every Listing Needs
These five corrections are non-negotiable for any listing photo, regardless of property type or price point. Apply them in this order for the most efficient workflow.
Step 1 — White Balance Correction

Mixed light sources are the most common color problem in interior real estate photography. Daylight from windows, incandescent bulbs, and LED fixtures all emit light at different color temperatures, creating uneven casts across the same room.
How to apply: Set white balance using a neutral reference point in the scene — a white wall, ceiling, or appliance. In Lightroom, use the eyedropper tool on that neutral area. For AI tools, white balance correction applies automatically on upload. Aim for a warm-neutral result that reads as natural, not clinical.
Correct for: Yellow or orange cast (tungsten), blue cast (overcast daylight), green cast (fluorescent). Each requires a different temperature and tint adjustment.
Step 2 — Lens Correction and Perspective Straightening
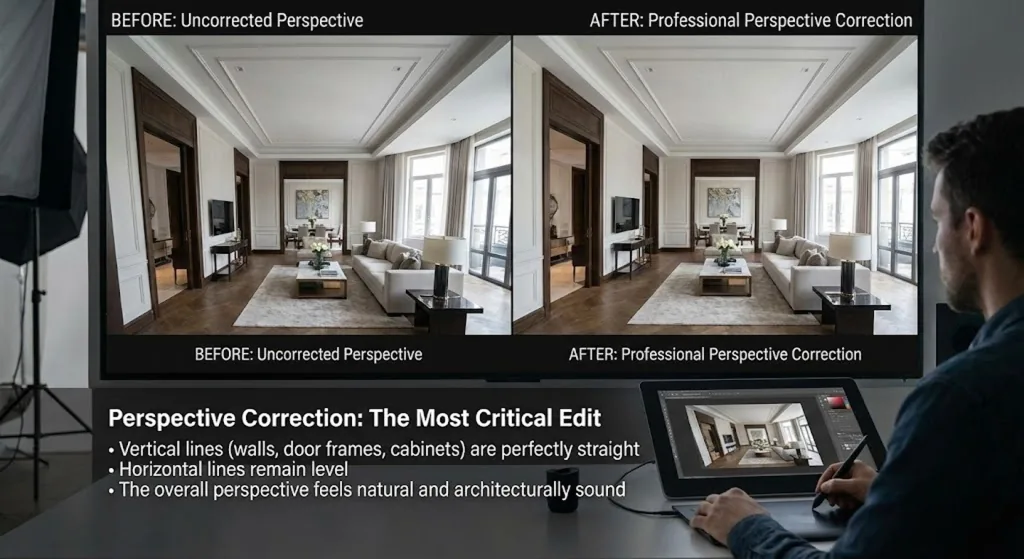
Perspective correction is the single most impactful technical edit in real estate photography. Leaning walls — where vertical lines converge toward the top of the frame — create an unconscious sense of instability that buyers register as unprofessional even if they cannot identify the cause.
How to apply:
- Enable lens profile correction in Lightroom or Camera Raw to remove barrel distortion
- Use the Vertical slider in Transform to straighten leaning walls
- Check that door frames, window frames, and cabinet edges are all perfectly vertical
- Crop out any blank canvas introduced by the transformation
Step 3 — Exposure and Shadow/Highlight Recovery
Proper exposure reveals detail throughout the frame — in shadows under furniture and in bright areas near windows. The goal is not maximum brightness but even, readable detail across all tonal areas.
How to apply: Start by setting overall exposure to a neutral midpoint. Then bring down highlights (particularly near windows) and lift shadows (dark corners and under furniture) independently. Use the Tone Curve for precision control over midtones. The final image should show clear detail in both the darkest and brightest areas of the room.
Fix Low-Resolution Listing Photos
Upscale blurry or low-res photos to 4K quality before MLS upload — sharp on every device.
Upscale Image Now →Step 4 — HDR Blending or Flambient Processing
HDR (High Dynamic Range)

Blends 3–7 bracketed exposures of the same scene to capture both interior detail and window views in a single output.
Best for: Standard residential interiors, faster shooting workflows, photographers working without flash equipment.
Limitation: Can produce slightly artificial or over-processed results if not carefully calibrated.
Flambient Technique

Manually blends a flash exposure (for clean, even interior lighting) with an ambient exposure (for natural window light and mood). Results are more natural than HDR.
Best for: Luxury properties, dark interiors, any property where natural lighting quality matters.
Limitation: Requires flash equipment on-site and more time in post-production.
Window Pulls

A separate darker exposure of each window is masked and blended into the properly exposed interior, making views and natural light visible instead of blown-out white rectangles.
Best for: Properties with desirable views, rooms where natural light is a selling feature.
Step 5 — Cropping and Composition Refinement
Strategic cropping removes distracting elements at frame edges and directs attention toward the property's best features. For real estate, the standard crop priorities are: remove partial furniture or objects at the very edge of the frame, ensure the dominant architectural feature (fireplace, kitchen island, view) is centered or given visual weight, and maintain a natural field of view that accurately represents room scale.
What to avoid: Over-cropping that misrepresents room size, or unusual aspect ratios that display poorly on MLS grid views. Standard 3:2 or 4:3 ratios work consistently across platforms.
Generate Custom Backgrounds for Your Listing Images
Replace flat or plain backgrounds with professional, context-appropriate settings in one click.
Try AI Background GeneratorStep-by-Step: Advanced Edits That Drive Clicks
These techniques go beyond technical correction into active marketing. Each one has a measurable impact on listing performance and is worth applying for mid-range to luxury properties.
Sky Replacement

An overcast or flat sky makes exterior photos look grey and uninviting regardless of the property's actual quality. Sky replacement substitutes the original sky with a vibrant blue sky and natural cloud formation.
Properties with blue-sky exterior photos receive 68% more engagement than identical listings with overcast skies. This is one of the highest-ROI edits available for exterior shots.
How to apply: Use Photoshop's Sky Replacement function (Edit → Sky Replacement) or a dedicated background removal tool. Select a sky that matches the time of day and lighting direction in the original photo — mismatched light direction between sky and property is the most common error.
Replace Grey Skies in One Click
Isolate the property from its background and add a clean, bright sky instantly.
Remove Backgrounds Free →Day-to-Dusk Conversion (Twilight)
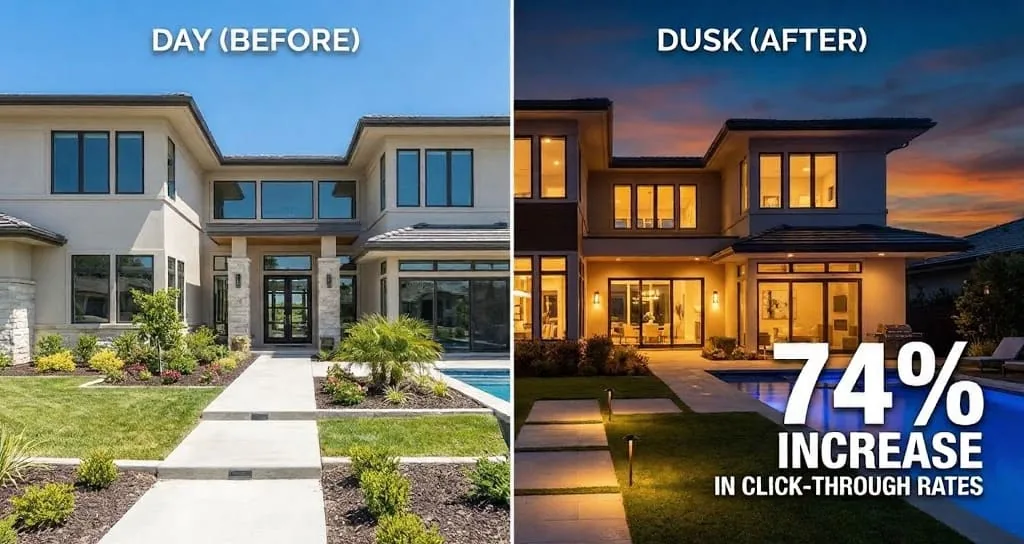
Twilight photos produce the highest emotional response of any exterior image type. The combination of glowing interior lights, a dramatic sky gradient, and soft landscape lighting creates a luxury impression that works at every price point.
Listings with twilight exterior photos see a 74% increase in click-through rates compared to standard daytime shots. For properties where outdoor living, curb appeal, or architectural lighting is a selling feature, this is the single highest-impact edit available.
How to apply: Shoot a daytime exterior with good exposure, then in Photoshop: replace the sky with a dusk gradient, darken the overall ambient light to simulate late evening, add warm light to windows using layer blending modes, and add subtle landscape uplighting. AI-powered twilight conversion tools automate most of this in a single step.
Object Removal and Digital Decluttering

Temporary objects — parked cars, garden hoses, trash bins, utility vehicles, personal items visible through windows — distract buyers and reduce perceived property value. Digital removal addresses these without requiring physical staging or rescheduled shoots.
How to apply: Use the AI Cleanup tool for straightforward removals (single objects on flat or patterned backgrounds). For complex removals involving architectural details, use Photoshop's Content-Aware Fill with a carefully drawn selection. Always check the replacement area for repeating texture patterns that indicate imperfect inpainting.
Virtual Staging
Empty rooms appear smaller than they are and fail to communicate how a space functions. Virtual staging digitally places appropriately scaled furniture and décor into vacant rooms, helping buyers understand room purpose and spatial relationships.
Virtually staged properties sell up to 73% faster than unstaged vacant listings. The technique is particularly high-value for new construction, investment properties, and any vacant listing where physical staging is not practical.
Disclosure requirement: All virtually staged images must be identified as such. Most MLS systems now require explicit labeling. Non-disclosure is both unethical and a potential liability.

Remove Clutter from Listing Photos Instantly
AI Cleanup removes stray cars, bins, and personal items from exterior and interior photos in seconds.
Open AI Cleanup Tool →Practical Example: Full Editing Workflow on a Single Property
This is how the full workflow applies to a typical occupied residential listing — a 3-bedroom home with challenging mixed lighting, a cloudy shoot day, and occupied rooms that could not be fully staged before photography.
| Edit Step | Problem Being Solved | Tool Used | Time (DIY) |
| White balance correction | Yellow cast from living room incandescent lights | Lightroom eyedropper on white ceiling | 2 min |
| Lens correction + perspective | Barrel distortion and leaning walls from wide-angle lens | Lightroom Transform panel | 3 min |
| HDR blend (3 exposures) | Blown-out windows alongside dark interior corners | Lightroom HDR merge | 5 min |
| Sky replacement (exterior) | Flat overcast sky on shoot day | Remove Background → custom sky overlay | 4 min |
| Object removal | Parked car in driveway, garden hose on lawn | AI Cleanup | 3 min |
| Upscaling for MLS output | Source files slightly under MLS recommended resolution | AI Image Upscaler | 1 min |
Total DIY time for the full workflow on this property: approximately 18 minutes per photo for an experienced editor. For a 25-photo listing, that is approximately 7–8 hours of editing work — a realistic benchmark for deciding whether to edit in-house or outsource.
Tools: DIY vs. AI vs. Outsourcing
Adobe Lightroom Classic

Best for: Professional photographers editing 6+ properties per week who need consistent batch processing and preset-based workflows.
- Non-destructive batch editing across entire property sets
- Powerful preset system for one-click style consistency
- Precise exposure, color, and perspective controls
- HDR merge and panorama stitching built in
Limitation: Steep learning curve; subscription required; limited for advanced compositing (object removal, sky replacement).
Adobe Photoshop

Best for: Advanced edits requiring precision compositing — flambient blending, window pulls, complex object removal, virtual staging integration.
- Layer-based workflow for precise manual blending
- Content-Aware Fill for complex object removal
- Sky Replacement automation
- Masking for selective adjustments at pixel level
Limitation: Not efficient for batch processing; requires significant time investment per image; requires experience to use effectively.
AI Tools (Modern Phototools)

Best for: Real estate agents, busy photographers, or anyone who needs fast, consistent results without a learning curve.
- One-click background and sky removal
- AI-powered object removal with automatic inpainting
- Instant upscaling to MLS-ready resolution
- No software installation; browser-based
Limitation: Less granular control than Photoshop for complex compositing; advanced flambient work still requires manual blending.
Outsourcing Cost Reference
| Service Type | Typical Cost per Image | Turnaround | Best For |
| Basic editing (exposure, color, verticals) | $0.50–$1.50 | 12–24 hours | Standard listings, high volume |
| HDR blending | $1.50–$3.00 | 24 hours | Properties with challenging interior lighting |
| Day-to-dusk conversion | $3.00–$7.00 | 24–48 hours | Luxury exteriors, properties with architectural lighting |
| Virtual staging | $15.00–$30.00 | 24–48 hours | Vacant properties, new construction, investment listings |
| Complex object removal | $5.00–$15.00 | 24–48 hours | Occupied homes requiring significant digital decluttering |
Explore All AI Editing Tools
Background removal, upscaling, object cleanup, and more — all in one platform.
View All ToolsProfessional Tips for Consistent Listing Quality
Establish a House Style Before Editing Begins
Inconsistent editing across a listing — some photos warm, some cool, some bright, some muted — reads as unprofessional and makes the property feel disjointed. Set a white balance, tone curve, and color profile target at the start of each property and apply it as a baseline preset before making individual photo adjustments. In Lightroom, sync settings across all images after correcting the first photo.
Edit Exterior and Interior Photos Separately
Exterior and interior photos require fundamentally different treatment — different white balance targets, different exposure strategies, different perspective correction priorities. Apply them as separate presets or adjustment groups rather than using the same starting point for both.
Match Sky Lighting Direction to Property Lighting
The most common sky replacement error is selecting a sky where sunlight comes from a different direction than the light falling on the property. If the property's shadows indicate sun from the right, the sky must show the same. Mismatched light direction is immediately visible to experienced buyers and looks manipulated.
Upscale Before Delivery, Not After Compression
Always upscale the image before exporting to MLS-ready JPEG. Upscaling after JPEG compression compounds artifacts. Run the raw or high-resolution processed file through the upscaler, then export the upscaled version at the target resolution and compression level.
Keep an Unedited Archive
Retain unedited originals for every property. If a sale is later disputed and photo misrepresentation is alleged, original files demonstrate that edits were enhancement rather than fabrication. This is standard professional practice and basic legal protection.
Common Mistakes to Avoid
✓ Effective Practices
- Apply white balance before exposure adjustments — color errors compound through tonal corrections
- Correct lens distortion before perspective — order matters for accurate vertical alignment
- Match sky light direction to existing property shadows
- Disclose virtual staging on every staged image
- Upscale originals, not compressed exports
- Sync baseline settings across all photos in a set before individual corrections
✗ Common Errors
- Over-brightening interiors until they look unnatural or bleached
- Over-saturating grass and foliage until colors look artificial
- Selecting sky replacements that do not match the season or time of day in the photo
- Removing permanent structural features (power lines, neighboring buildings)
- Inconsistent color temperature across photos in the same listing
- Exporting at low resolution to save file size — results look soft on MLS grid views
Ethical Limits: What You Can and Cannot Edit
The guiding principle: Edit to show the property as it appears on its best day — not to create a version that does not exist. If a buyer would be surprised or disappointed seeing the property in person based on the listing photos, the edit crossed the line.
Acceptable Edits
- Temporary objects: Removing cars, bins, garden hoses, seasonal debris
- Seasonal adjustments: Greening dormant grass, replacing overcast sky with accurate blue sky
- Lighting corrections: Balancing exposure, correcting color cast, showing window views
- Lens corrections: Removing barrel distortion, straightening verticals
- Virtual staging: Adding furniture to vacant rooms — when disclosed on every image
- Minor decluttering: Removing personal items, excess furniture that was present during shooting
Edits to Avoid
- Permanent features: Removing power lines, neighboring structures, permanent fixtures
- Structural concealment: Hiding visible cracks, water stains, damage, or deferred maintenance
- Invented features: Adding landscaping, trees, or exterior elements that do not exist
- Room size manipulation: Using extreme perspective correction to make rooms appear larger than they are
- Neighborhood alteration: Changing views, removing neighboring buildings, altering the surrounding environment
- Undisclosed digital staging: Presenting virtually staged images without identification
"The goal of real estate photo editing should be to present the property as it would appear on its very best day — not to create a fictional version that disappoints buyers during in-person showings."
Frequently Asked Questions About Real Estate Photo Editing
Is real estate photo editing legal?
Yes — real estate photo editing is legal and standard industry practice within ethical boundaries. Enhancing exposure, correcting color, straightening perspective, and removing temporary objects are all accepted. What crosses into misrepresentation is concealing permanent property defects, altering structural features, or presenting virtually staged images without disclosure. Follow your local MLS rules on edited images and always disclose digital staging.
How long does it take to edit real estate photos?
Time per photo for an experienced editor: basic edits (white balance, exposure, perspective) 5–10 minutes; HDR blending 10–15 minutes; sky replacement or object removal 10–20 minutes; day-to-dusk conversion 20–40 minutes; virtual staging 30–60 minutes per room. Professional outsourcing services deliver standard edits in 12–24 hours and advanced edits in 24–48 hours.
What resolution do MLS photos need to be?
Most MLS systems require a minimum of 1024×768 pixels, but for optimal display across devices aim for 2000–4000 pixels on the long edge. Export as JPEG at 80–90% quality for the best balance of file size and visual sharpness. Use the AI Image Upscaler to bring low-resolution source files up to MLS-ready quality before export.
What is the difference between HDR and flambient?
HDR blends 3–7 bracketed exposures of the same scene in software to balance highlights and shadows — faster to shoot, widely supported in Lightroom, but can look slightly processed. Flambient manually blends a flash exposure (for clean, even interior lighting) with an ambient exposure (for natural mood and window light) using layers in Photoshop — more time-intensive but produces more natural, controllable results. Flambient is the preferred technique for luxury properties; HDR is sufficient for standard residential listings.
Can I remove permanent features like power lines in editing?
No — removing permanent features is generally considered unethical and potentially fraudulent misrepresentation. The test is simple: would a buyer be surprised or disappointed when viewing the property in person? Apply that standard to every edit. Temporary objects (vehicles, bins, seasonal items) are acceptable to remove. Permanent structures, infrastructure, neighboring buildings, and physical defects are not.
The Future of Real Estate Photo Editing
The editing techniques covered in this guide represent current best practice — but the field is moving fast. AI-powered tools are compressing the time required for the most labor-intensive edits: object removal, sky replacement, and virtual staging that previously required 20–60 minutes per image can now be completed in under a minute with current AI tools, and accuracy continues to improve.
The next developments already visible in early-stage tools include: automatic HDR blending that requires no bracketed shooting — a single exposure is computationally expanded to the full dynamic range; real-time virtual staging that applies as buyers browse listings rather than as a static edited image; and AI-generated twilight conversions that match light direction and seasonal context automatically.
For agents and photographers, the practical implication is that the cost and time barrier to professional-quality listing photos is falling continuously. The standard buyers expect is rising at the same pace. Listings that were competitive with basic editing two years ago now need the full workflow — perspective correction, HDR or flambient, sky replacement, object removal — to read as professional in today's market.
The ethical framework does not change with the technology. Faster tools make misrepresentation easier to produce, which makes understanding and following the ethical limits more important, not less.